Hay everyone! well today I will not give you any tutorial, but I give you the result of my tutorial. Start from hot potatoes and Flash. Ok then, to know the result of my tutorial before. Open these link below!
1. Hot Potatoes
https://www.youtube.com/watch?v=Prozl8RwokM&spfreload=10
2. Flash
https://www.youtube.com/watch?v=vIx0suBb4C4
Minggu, 12 Juni 2016
Tutorial of my matery
Hallo everyone, welcome back to my blog. Today I would like to show you the tutorial of my matery that I can used to teach my students. There will be two matery that I will show you, color and article. In this case, I will used "motion shape" for the writing. To know the tutorial of "motion shape" check this link http://mediaforteaching.blogspot.co.id/2016/06/tutorial-of-masking-and-motion-shape.html .Ok then, check it out!
ARTICLE
1. I open my flash document

2. I made nine layers. See the picture below.


3. In each layer I wrote suit with the layers' name. I wrote like this (see the picture below)


ARTICLE
1. I open my flash document

2. I made nine layers. See the picture below.

3. In each layer I wrote suit with the layers' name. I wrote like this (see the picture below)

4. I made three buttons in this matery. They are "play", "stop", and "back"." Back" here will bring me to this one (check this link http://mediaforteaching.blogspot.co.id/2016/06/tutorial-of-my-flash.html ) I can called this link as "home"
I have explained the tutorial of "play" and "back" button (check this link http://mediaforteaching.blogspot.co.id/2016/06/my-biography.html )
Now, I will give tutorial of "back" button. See the tutorial below check it out:
a. Make the button of "back". I used "rectangle tool" and "text tool"
b. remember that this button will bring us to the "home" so I will call the file ("home" file). Before calling the file. I right click the button then "convert to symbol" and choose "button".
c. After that I click the "back" button and click shift+f3. (See this link to know how call another file http://mediaforteaching.blogspot.co.id/2016/06/tutorial-of-my-flash.html )
d. And finish. Now when I click the button, the button will back to "home"
5. Finiisshh, the I just save my work. O yeah, don't forget to save weather the .fla or .swf in ONE FOLDER.
COLOR
1. I open my new flash document
2. I gave a background of it

3. Then I made seven layers. See the picture below!


4. In each layer I wrote suit with the layers' name. I wrote like this (see the picture below)

5. Just like the tutorial above (article matery) here I used three buttons which has their won function. I used "back", "stop" and "play" button. The way how make these button works is same with the tutorial above. So, I don't need to explain again.
6. After all finish, I save my work in ONE FOLDER
FINIIISSHH!! HAPPY TRYING AND HAPPY WATCHING :) :)
Sabtu, 11 Juni 2016
My biography
Hello Everyone! in this case I will show you my flash. This flash will talk about my biography. This file is one of file that I call in the previous tutorial (check this one http://mediaforteaching.blogspot.co.id/2016/06/tutorial-of-my-flash.html )
Ok then, directly check the tutorial below. Happy trying!
1. I open my flash document first

2. I gave the backgound (for knowing how to give background check my blog : http://mediaforteaching.blogspot.co.id/2016/06/tutorial-of-my-flash.html )
 that is my background.
3. After that, I made four layers which have a name as "background, foto, nama, NIM". background for the background itself, foto for my photo, nama as my name, and the lasst NIM for my student's number. Ok then, in this background I just used effect "motion shape". I have given the tutorial of "motion shape" in my previous blog. Check this link http://mediaforteaching.blogspot.co.id/2016/06/tutorial-of-masking-and-motion-shape.html.

that picture show the layer that I made. And the pictute below is the description/the content from each layers

4. You will see there are two buttons there. "stop" and "play". The function of those buttons are to stop and play when I clicked it. Now, I will show you the tutorial of making our object stop and play by using those buttons. Here are the steps:
a. I made the buttons fisrt. I just click "rectangle tool" and "text tool" then I gave name play and stop

b. After that I clicked (in each symbol) Right click "convert to symbol ==> button"


c. Now it's time for giving order to those buttons. For button "play" what I did was right click ==> action. Then there was a new step that I should did. I made order like this (see the picture below!) I can write it directly (the red circle I meant) or I can do other ways.

below are the others way to give order to my buttons
----> Click global function ==> movie clip control ==> on
---> Click global function ==> timeline control ==> stop/play


and finish, now my button will work as the order that I have given.
5. The last step is I save my work. Finiiiissshhhh
Well, that's about my tutorial when I made my biography for fulling my school assignment. Ok gaes, SEE YAAA!!
Ok then, directly check the tutorial below. Happy trying!
1. I open my flash document first

2. I gave the backgound (for knowing how to give background check my blog : http://mediaforteaching.blogspot.co.id/2016/06/tutorial-of-my-flash.html )

3. After that, I made four layers which have a name as "background, foto, nama, NIM". background for the background itself, foto for my photo, nama as my name, and the lasst NIM for my student's number. Ok then, in this background I just used effect "motion shape". I have given the tutorial of "motion shape" in my previous blog. Check this link http://mediaforteaching.blogspot.co.id/2016/06/tutorial-of-masking-and-motion-shape.html.

that picture show the layer that I made. And the pictute below is the description/the content from each layers

4. You will see there are two buttons there. "stop" and "play". The function of those buttons are to stop and play when I clicked it. Now, I will show you the tutorial of making our object stop and play by using those buttons. Here are the steps:
a. I made the buttons fisrt. I just click "rectangle tool" and "text tool" then I gave name play and stop

b. After that I clicked (in each symbol) Right click "convert to symbol ==> button"


c. Now it's time for giving order to those buttons. For button "play" what I did was right click ==> action. Then there was a new step that I should did. I made order like this (see the picture below!) I can write it directly (the red circle I meant) or I can do other ways.

below are the others way to give order to my buttons
----> Click global function ==> movie clip control ==> on
---> Click global function ==> timeline control ==> stop/play


and finish, now my button will work as the order that I have given.
5. The last step is I save my work. Finiiiissshhhh
Well, that's about my tutorial when I made my biography for fulling my school assignment. Ok gaes, SEE YAAA!!
Tutorial of my Flash
Hay Hay Hay, fiiiuuhhh today is really hard day for me because I make three tutorials in a day. But, it's Okay, because I love to share. So, at this time I will show you tutorial of my flash. There will be masking, guiding, shape, button, and calling another file. Before it, you have to know that this flash will contain material of teaching English. Those are color and article. So, I make like the media for teacher. Well, it will be a long tutorial, so enjoy my tutorial for this time. Check it out!!
1. First of all I open my flash document and set the height and width.

2. Because I like picture, so I add picture as the background. I just click "file ==> import ==> import to library then I choose the picture that I wanted from my local disk.

3. After that I drag the picture to the page. I drag the picture from this.
 See the picture below
 4. Well okay, then I add new layer and I gave it name "tombol", oo yeah, for the background I gave name background

5.After that I made three buttons by using "rectangle tool" which have name "biography, article, and color" Look at the picture below.

6. And then, I right click in each button and choose "convert to symbol" and ten "button"
7. I wanna made when I click each button, it will bring me to what have been written in those buttons. for example, when I click article so it will show the material of article and so on. So the steps are:
a. I click twice in every button in turn, and it will bring me to other step. Look at the the picture below
b. You will see, that the frame will change. For this frame I right click and "insert keyframe". After that click the arrow for backing to the previous step. Look at the picture below.

c. After that I click Shift+f3 to call the file that I wanna call. Look at the example below

d. Next step is, click "movie clip ==> load external movie clip" then I "save as" my work first and save it in one folder with the file that I wanna call.

e. Then I wrote the file name that I wanna call after that click Ok. Look at my example below

f. Taraaaaa and finish. Now, when I click each button it will show to me the matery that I have made before.
That's all from my tutorial today, hopefully my explanation is clear enough for everyone. Bye Bye!! :)
1. First of all I open my flash document and set the height and width.

2. Because I like picture, so I add picture as the background. I just click "file ==> import ==> import to library then I choose the picture that I wanted from my local disk.

3. After that I drag the picture to the page. I drag the picture from this.


5.After that I made three buttons by using "rectangle tool" which have name "biography, article, and color" Look at the picture below.

6. And then, I right click in each button and choose "convert to symbol" and ten "button"
7. I wanna made when I click each button, it will bring me to what have been written in those buttons. for example, when I click article so it will show the material of article and so on. So the steps are:
a. I click twice in every button in turn, and it will bring me to other step. Look at the the picture below
b. You will see, that the frame will change. For this frame I right click and "insert keyframe". After that click the arrow for backing to the previous step. Look at the picture below.


c. After that I click Shift+f3 to call the file that I wanna call. Look at the example below

d. Next step is, click "movie clip ==> load external movie clip" then I "save as" my work first and save it in one folder with the file that I wanna call.

e. Then I wrote the file name that I wanna call after that click Ok. Look at my example below

f. Taraaaaa and finish. Now, when I click each button it will show to me the matery that I have made before.
That's all from my tutorial today, hopefully my explanation is clear enough for everyone. Bye Bye!! :)
Jumat, 10 Juni 2016
Tutorial of Masking and motion shape (Macromedia flash 8)
Hi everyone, welcome to my blog. Today I will show you the tutorial of Mask and motion shape in the macromedia flash 8. Ok directly check my tutorial out!
MASKING
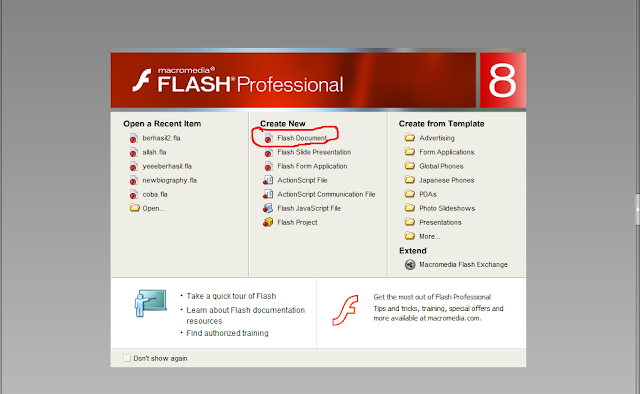
1. Open your macromedia flash 8 and then click "flash document"

2. The first appearance will be like this


7. Now, still in the layer 2, click in the frame 10 and "create motion twin.

8. Move the cursor in the frame 20 and move the round. see the picture below


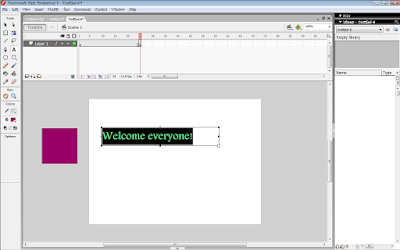
4. After that, make a text by using text tool then block it and push ctrl+b twice
5. And then, put the cursor in the frame 10 and right click, choose action. Then you will see there is a box under the page. If so, choose "twin" and "shape"

6. ctrl+enter Finiiisshhh, don't forget to save your work oke!
That's all from this tutorial. I hope my explanation is clear enough for those who read by blog. Bye Bye See Yaaaaa!! :)
MASKING
1. Open your macromedia flash 8 and then click "flash document"

2. The first appearance will be like this

3.Then make a text by using Text Tool

4. Insert frame in the frame 20. Lokk at the picture below

5. After that add new layer. in the new layer or layer 2 make a round shape by using "oval tool". Look at the picture below

6. And then insert keyframe in the frame 20. See the picture below

7. Now, still in the layer 2, click in the frame 10 and "create motion twin.

8. Move the cursor in the frame 20 and move the round. see the picture below


9. Right click in the layer 2, then choose "Mask". See the example below

10. Now push ctrl+enter. Taraaaa finish!!
Well Oke that's the tutorial of Masking. Now, I will show you the tutorial of motion shape
MOTION SHAPE
1. Open your new document of flash

2. Make a rectangle by using "rectangle tool" (put the rectangle out of the page) see the picture below

3. then click in the frame 25 ==> right click ==> Insert keyframe

4. After that, make a text by using text tool then block it and push ctrl+b twice

5. And then, put the cursor in the frame 10 and right click, choose action. Then you will see there is a box under the page. If so, choose "twin" and "shape"

6. ctrl+enter Finiiisshhh, don't forget to save your work oke!
That's all from this tutorial. I hope my explanation is clear enough for those who read by blog. Bye Bye See Yaaaaa!! :)
Tutorial of motion guide
Hi everyone. How's life? well, today in this beautifull occasion I would like to share or to show you the tutorial of Guide and Mask in the Flash Macromedia 8. Ok then, check it out.
1. Open your flash macromedia 8 and then click "flash document"
2. And then you will be brought in this step.

3.Next is make line in layer 1 using "pencil tool" and give a name in layer one by "Garis"

4. After that Right click in the "Garis" choose "guide"

5. After guiding then add new layer

6. In the new layer make a round

7. Still in the layer one, then Right click in the round shape choose "convert to symbol"

8. then choose graphic

9. And then, add "keyframe" in the frame 15

10. And then click the end of the frame of layer 2 and move the round there.

11. In the middle of frame 15 click "create motion twin"
 12. After that change the layer 2 under the "garis" lokk at to the picture below.

13. To know your work push ctrl+enter
14. Save your work by clicking file ==> save as (the file will be .fla)
15. To save your movie click "export ==> export movie"
Well that's all from my tutorial today. SEE YAA!!
Wassalamu'alaikum :)
1. Open your flash macromedia 8 and then click "flash document"

2. And then you will be brought in this step.

3.Next is make line in layer 1 using "pencil tool" and give a name in layer one by "Garis"

4. After that Right click in the "Garis" choose "guide"

5. After guiding then add new layer

6. In the new layer make a round

7. Still in the layer one, then Right click in the round shape choose "convert to symbol"

8. then choose graphic

9. And then, add "keyframe" in the frame 15

10. And then click the end of the frame of layer 2 and move the round there.

11. In the middle of frame 15 click "create motion twin"


13. To know your work push ctrl+enter
14. Save your work by clicking file ==> save as (the file will be .fla)
15. To save your movie click "export ==> export movie"
Well that's all from my tutorial today. SEE YAA!!
Wassalamu'alaikum :)
Langganan:
Komentar (Atom)